
Real-World RL with XSquare Turtle2#
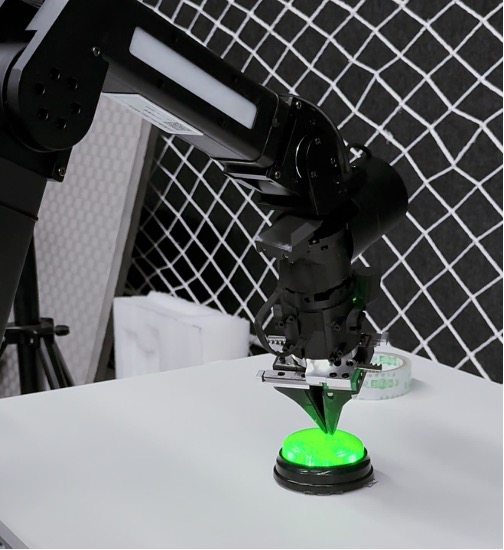
XSquare Turtle2 dual-arm robot used for SAC/CNN real-world button-pressing training.#
Train a real-world policy on the XSquare Turtle2 dual-arm robot. You will enter the vendor controller container, install RLinf dependencies, set target poses for button pressing, and launch SAC/CNN training across robot and GPU nodes.
Overview#
Train a visual SAC policy for button pressing on XSquare Turtle2.
CNN policy
SAC · Cross-Q · RLPD
Button pressing
XSquare Turtle2 · 1–2 arms · cameras
Tasks#
Task |
Config / entry point |
Description |
|---|---|---|
Dummy check |
|
Validate config and cluster plumbing without hardware motion. |
Training |
|
Train button pressing with one or two active arms. |
Monitoring |
TensorBoard logs |
Track reward, return, and replay-buffer statistics. |
Observation and Action#
Field |
Description |
|---|---|
Observation |
Up to three RGB camera streams plus TCP pose per active arm. |
Action |
7-D continuous delta pose and gripper command per arm. |
Reward |
|
Prompt |
|
Hardware Setup#
The real-world setup requires:
Robot: XSquare Turtle2 dual-arm robot
Cameras: Up to 3 RGB cameras mounted on the robot (IDs 0–2)
Training / Rollout Node: A computer with GPU support for running the CNN policy
Robot Controller Node: A small computer (GPU not required) connected to the robot in the same local network
Warning
Ensure the training node and the robot controller node are in the same local network.
Installation#
The controller node and the training/rollout node(s) require different software dependencies.
Robot Controller Node#
The XSquare Turtle2 platform ships with its own SDK and ROS-based controller stack. Please ensure that you have entered the official Docker container of Xsquare before starting the following installation.. Contact XSquare for the exact Docker image and startup instructions.
After entering the XSquare Docker container, clone the RLinf repository inside it:
# For mainland China users, you can use the following for better download speed:
# git clone https://ghfast.top/github.com/RLinf/RLinf.git
git clone https://github.com/RLinf/RLinf.git
cd RLinf
Then install the RLinf Python dependencies for the embodied real-world setup:
# For mainland China users, you can add the `--use-mirror` flag for better speed.
bash requirements/install.sh embodied --env xsquare_turtle2
source .venv/bin/activate
Training / Rollout Nodes#
A. Clone RLinf Repository#
# For mainland China users, you can use the following for better download speed:
# git clone https://ghfast.top/github.com/RLinf/RLinf.git
git clone https://github.com/RLinf/RLinf.git
cd RLinf
B. Install Dependencies#
Option 1: Docker Image
# use maniskill_libero image for training / rollout nodes
docker run -it --rm --gpus all \
   --shm-size 20g \
   --network host \
   --name rlinf \
   -v .:/workspace/RLinf \
   rlinf/rlinf:agentic-rlinf0.3-maniskill_libero
   # For mainland China users, you can use the following for better download speed:
   # docker.1ms.run/rlinf/rlinf:agentic-rlinf0.3-maniskill_libero
Option 2: Custom Environment
# install openvla + maniskill_libero environment on training / rollout nodes
# For mainland China users, you can add the `--use-mirror` flag for better speed.
bash requirements/install.sh embodied --model openvla --env maniskill_libero
source .venv/bin/activate
Download the Model#
Before starting training, download the pretrained ResNet CNN backbone:
# Method 1: Using git clone
git lfs install
git clone https://huggingface.co/RLinf/RLinf-ResNet10-pretrained

# Method 2: Using huggingface-hub
# For mainland China users:
# export HF_ENDPOINT=https://hf-mirror.com
pip install huggingface-hub
hf download RLinf/RLinf-ResNet10-pretrained --local-dir RLinf-ResNet10-pretrained
After downloading, update the model_path field in the configuration YAML file.
Run It#
Prerequisites#
Acquire the Target End-Effector Pose
For each task, you need to record the target end-effector pose that triggers a success signal. Move the robot arm(s) to the desired target pose manually via the XSquare control interface, then read back the pose.
The pose is stored as Euler angles in the format
[x, y, z, rz, ry, rx] (XSquare convention). Record this for both
arms if using dual-arm mode.
Cluster Setup#
Before starting the experiment, set up the Ray cluster properly.
Warning
This step is critical. Any misconfiguration may cause missing packages or failure to control the robot.
RLinf uses Ray for managing distributed environments. When ray start is run on
a node, the current Python interpreter and environment variables are recorded and
inherited by all subsequent Ray processes on that node.
We provide ray_utils/realworld/setup_before_ray.sh to help configure the environment
before starting Ray on each node. Modify and source it before ray start.
The script sets up the following:
Source the correct virtual Python environment (see Dependency Installation above).
On the controller node: ensure the XSquare SDK packages are discoverable (this is handled automatically when using the XSquare official Docker image).
Set RLinf environment variables on all nodes:
export PYTHONPATH=<path_to_your_RLinf_repo>:$PYTHONPATH
export RLINF_NODE_RANK=<node_rank_of_this_node>
export RLINF_COMM_NET_DEVICES=<network_device>  # Optional if only one NIC
RLINF_NODE_RANK is set to 0 ~ N-1 for each of the N nodes.
RLINF_COMM_NET_DEVICES is only needed if the machine has multiple network interfaces;
check with ifconfig or ip addr.
Start Ray on each node after sourcing the script:
# On the head node (node rank 0)
ray start --head --port=6379 --node-ip-address=<head_node_ip_address>

# On worker nodes (node rank 1 ~ N-1)
ray start --address='<head_node_ip_address>:6379'
Run ray status to verify the cluster is up.
Configuration File#
Modify examples/embodiment/config/realworld_button_turtle2_sac_cnn.yaml to match
your setup.
Key fields to update:
cluster:
  num_nodes: 2  # 1 training/rollout node + 1 controller node
  component_placement:
    actor:
      node_group: "gpu"
      placement: 0
    rollout:
      node_group: "gpu"
      placement: 0
    env:
      node_group: turtle2
      placement: 0
  node_groups:
    - label: "gpu"
      node_ranks: 0
    - label: turtle2
      node_ranks: 1
      hardware:
        type: Turtle2
        configs:
          - node_rank: 1

env:
  train:
    override_cfg:
      is_dummy: False
      use_arm_ids: [1]          # 0=left arm, 1=right arm; use [0,1] for dual arm
      use_camera_ids: [2]       # camera IDs to use (0, 1, or 2)
      target_ee_pose:           # [[left_arm_pose], [right_arm_pose]], Euler [x,y,z,rz,ry,rx]
        - [0, 0, 0, 0, 0, 0]
        - [0.3, 0.0, 0.15, 0.0, 1.0, 0.0]

actor:
  model:
    model_path: "/path/to/RLinf-ResNet10-pretrained"
    state_dim: 6    # 6 for single arm (xyz+euler); 12 for dual arm
    action_dim: 6   # 6 for single arm (xyz_delta+rpy_delta); 12 for dual arm

rollout:
  model:
    model_path: "/path/to/RLinf-ResNet10-pretrained"
For the button-pressing task, the target_ee_pose defines both the success
threshold position and the reset position (arms reset to a pose slightly above the
target along the Z axis).
Testing the Setup (Optional)#
Before running the full experiment, you can verify the setup using dummy mode:
Set is_dummy: True in both env.train.override_cfg and env.eval.override_cfg
to enable dummy mode (no real robot required). This validates the cluster and model
pipeline without physical robot interaction.
Run on the head node:
bash examples/embodiment/run_realworld_async.sh realworld_dummy_turtle2_sac_cnn
Run It#
After verifying the setup, start the real-world training experiment on the head node:
bash examples/embodiment/run_realworld_async.sh realworld_button_turtle2_sac_cnn
Visualization and Results#
1. TensorBoard Logging
On the Ray head node:
tensorboard --logdir ./logs --port 6006
2. Key Metrics Tracked
Environment Metrics:
env/episode_len: Number of environment steps elapsed in the episode (unit: step).env/return: Episode return.env/reward: Step-level reward.env/success_once: Whether the robot succeeded at least once in the episode (0 or 1).
Training Metrics:
train/sac/critic_loss: Q-function loss.train/critic/grad_norm: Q-function gradient norm.train/sac/actor_loss: Policy loss.train/actor/entropy: Policy entropy.train/actor/grad_norm: Policy gradient norm.train/sac/alpha_loss: Temperature parameter loss.train/sac/alpha: Temperature parameter value.train/alpha/grad_norm: Temperature gradient norm.train/replay_buffer/size: Current replay buffer size.train/replay_buffer/max_reward: Maximum reward in replay buffer.train/replay_buffer/min_reward: Minimum reward in replay buffer.train/replay_buffer/mean_reward: Mean reward in replay buffer.train/replay_buffer/utilization: Replay buffer utilization rate.