Real-World RL with Franka#
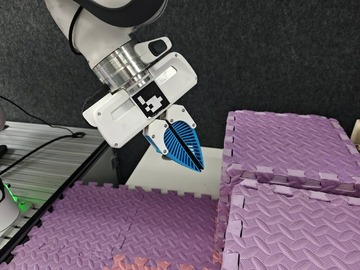
Franka Emika Panda arm used for the base RLinf real-world RL workflow.#
Use RLinf to train and evaluate real-world policies on a Franka Emika Panda arm. You’ll set up the controller and training nodes, collect demonstrations, run SAC/RLPD or PPO-style training, and monitor safe online updates on physical hardware.
Overview#
Train a real-world manipulation policy from camera observations and robot feedback.
CNN policy · OpenPI π₀.₅
SAC · Cross-Q · RLPD · PPO
Peg insertion · charger · PnP
Franka · RealSense/ZED · gripper
env/reward and videos.Tasks#
Task |
Config / entry point |
Description |
|---|---|---|
Peg insertion |
|
Insert a peg at a target end-effector pose. |
Charger |
|
Align and insert a charger using real-world reward feedback. |
PnP / eval |
|
Collect or deploy pick-and-place style policies. |
Observation and Action#
Field |
Description |
|---|---|
Observation |
RGB camera frames plus optional robot state. |
Action |
6D/7D continuous Cartesian delta action, optionally with gripper control. |
Reward |
Task success, keyboard labels, or dense task-specific feedback. |
Prompt |
Real-world task text in the env config when a VLA policy is used. |
Hardware Setup#
The real-world setup requires the following hardware components:
Robotic Arm: Franka Emika Panda
Cameras: Intel RealSense cameras (default) or Stereolabs ZED cameras
Gripper: Franka hand (default) or Robotiq 2F-85/2F-140
Computing Unit: A computer with GPU support for training the CNN policy
Robot Controller: A small computer (does not require GPU) connected with the robotic arm in the same local network
Space Mouse (Optional): For teleoperation data collection or human intervention during training.
GELLO (Optional): A joint-level teleoperation device as an alternative to SpaceMouse, providing more intuitive control with native gripper support.
VR / PICO (Optional): A headset-and-controller teleoperation device for 6D end-effector control, usable as an alternative to SpaceMouse for data collection.
Warning
Ensure all computers are networked in the same local network. The robot arm is only required to be in the same local network as the robot controller.
Note
Using ZED cameras or Robotiq grippers? See the dedicated guide Using ZED + Robotiq with Franka for SDK installation, serial-device setup, YAML configuration fields, and data collection.
Using VR / PICO teleoperation? See Real-World Franka with VR Teleoperation for XRoboToolkit, ZeroMQ, PICO wrapper configuration, and operation steps.
Installation#
The controller node and the training/rollout node(s) should be set up with different software dependencies.
Robot Controller Node#
1. Check Franka Firmware Version#
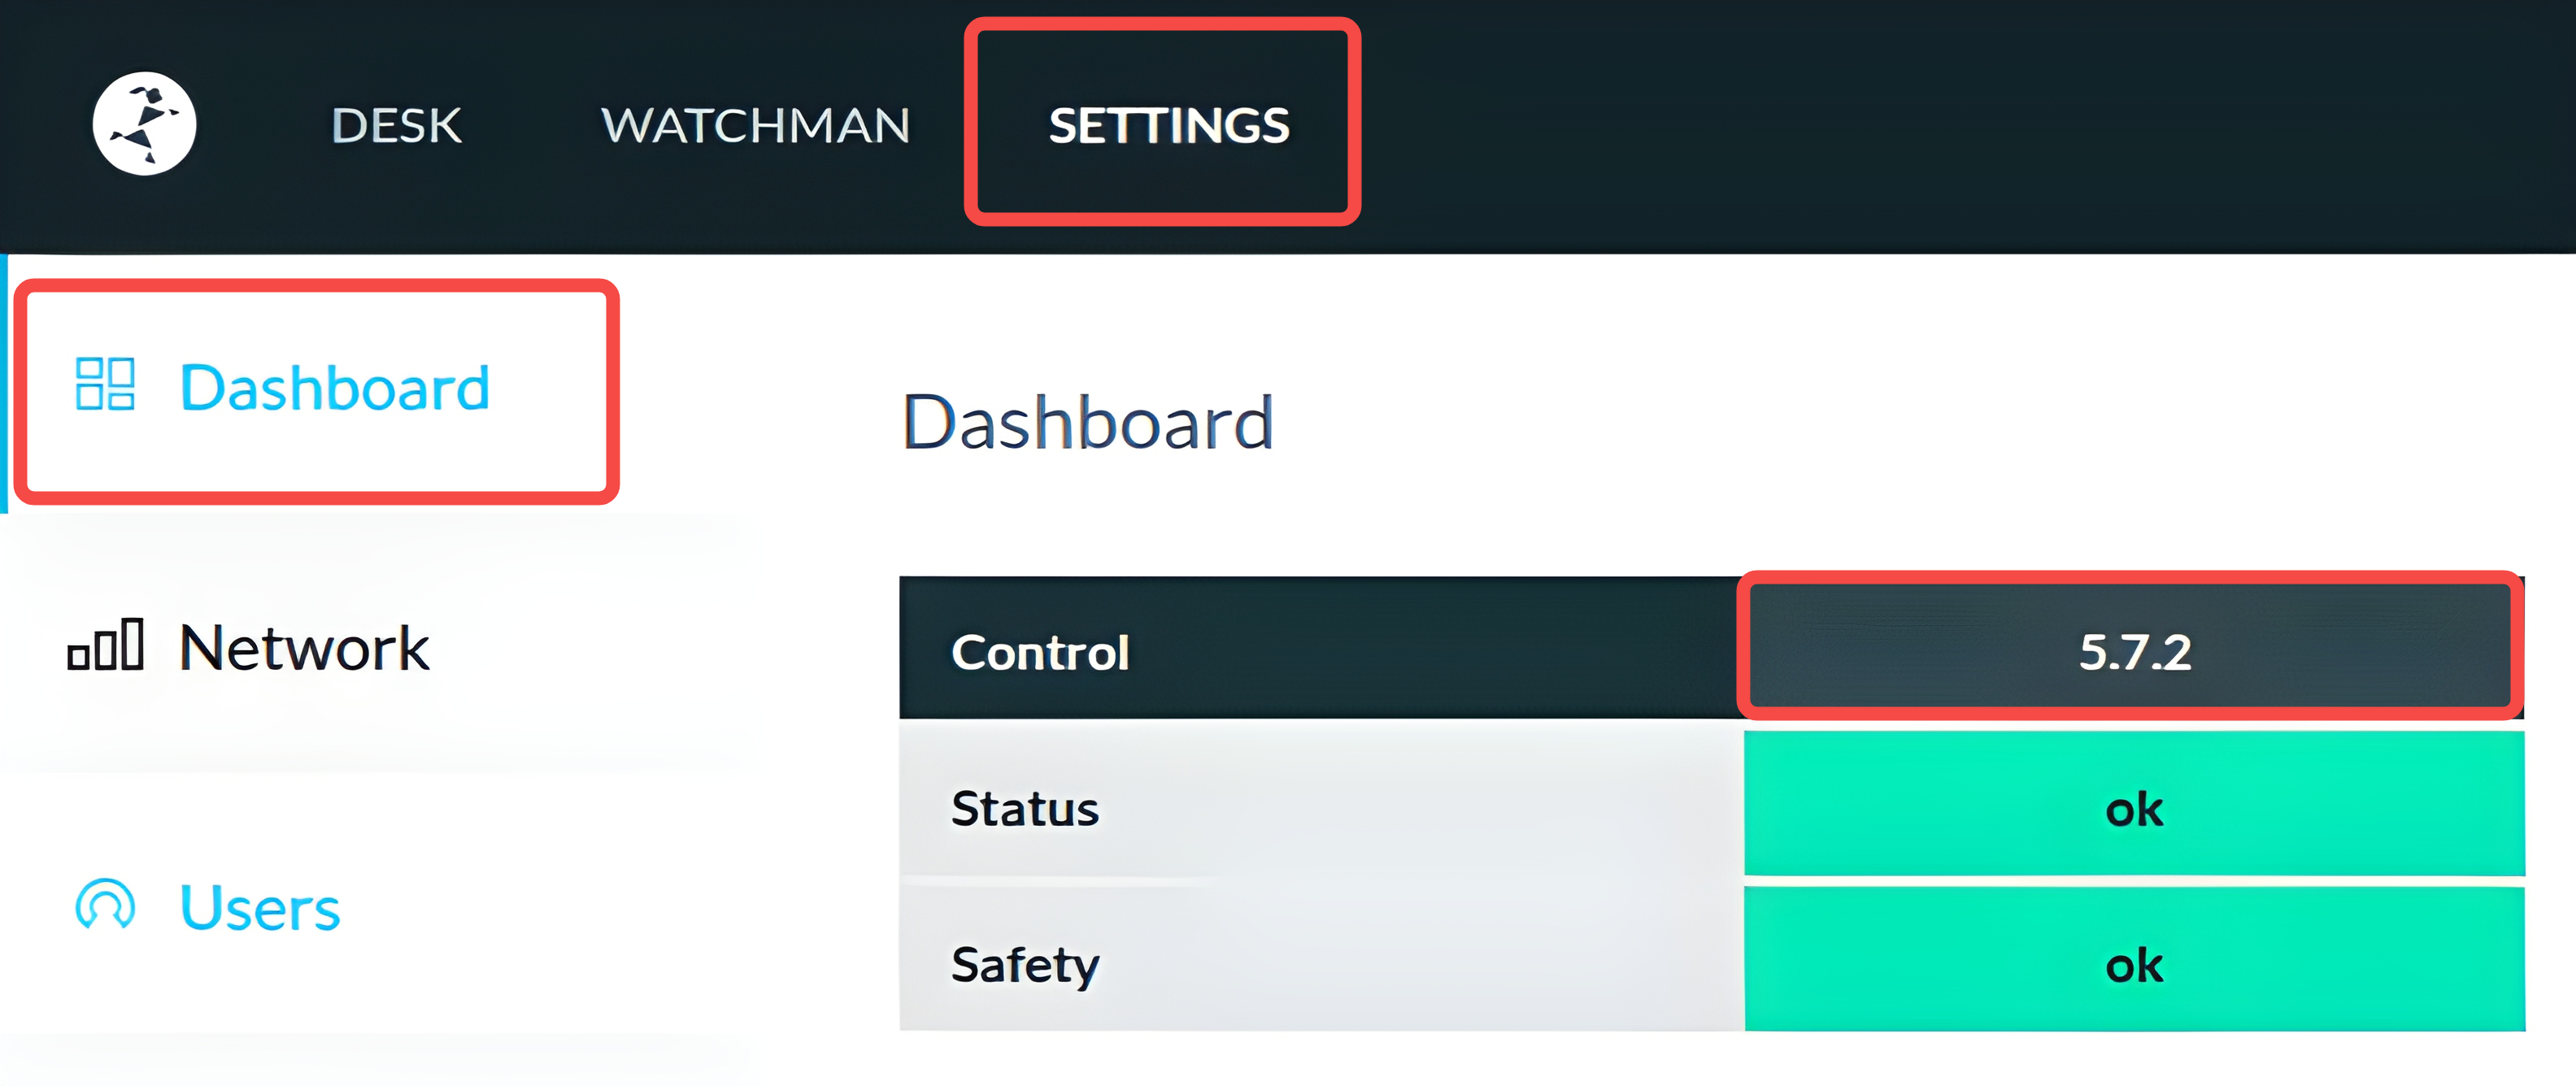
Go to the robot’s management webpage (usually at http://<robot_ip>/desk), click on the SETTINGS tab, and check the version number following Control in DashBoard as follows.
Please take a note of the firmware version for later use.
Warning
Make sure that the Franka firmware version is <5.9.0 for compatibility with the serl_franka_controllers.
Firmware version 5.7.2 is recommended for best compatibility.
2. Real-time Kernel Installation#
The Franka controller is recommended to run on a real-time kernel for better performance. Follow the instructions in Franka documentation to install the real-time kernel.
3. Installation#
a. Clone RLinf Repository#
# For mainland China users, you can use the following for better download speed:
# git clone https://ghfast.top/github.com/RLinf/RLinf.git
git clone https://github.com/RLinf/RLinf.git
cd RLinf
b. Install Dependencies#
Option 1: Docker Image
Use Docker image for the experiment.
To access the robot, camera, and space mouse devices from within the docker container, it is recommended to run the container in the privileged mode:
docker run -it --rm \
   --privileged \
   --network host \
   --name rlinf \
   -v .:/workspace/RLinf \
   rlinf/rlinf:agentic-rlinf0.3-franka
   # For mainland China users, you can use the following for better download speed:
   # docker.1ms.run/rlinf/rlinf:agentic-rlinf0.3-franka
Currently, the docker image contains libfranka version 0.10.0, 0.13.3, 0.14.1, 0.15.0, and 0.18.0 with franka_ros version 0.10.0.
These versions are selected based on the compatibility matrix in Franka compatibility. Please check your Franka firmware version and find which libfranka version is compatible with it.
Having determined the compatible libfranka version, you can switch to the corresponding virtual environment in the docker container by running:
source switch_env franka-<libfranka_version>
# e.g., for libfranka version 0.15.0
# source switch_env franka-0.15.0
Option 2: Custom Environment
Our installation script consists of the installation of two parts:
Python dependencies for RLinf framework and real-world RL training.
ROS Noetic, libfranka, franka_ros, and serl_franka_controllers for Franka control.
Warning
The installation script only supports Ubuntu 20.04 due to ROS Noetic requirements.
Warning
If you have already installed ROS Noetic, libfranka, franka_ros and serl_franka_controllers manually, you can skip the installation of these packages by setting the environment variable export SKIP_ROS=1 before running the installation script.
If you have skipped these installations, please make sure that you have sourced the ROS setup script (usually at /opt/ros/noetic/setup.bash), as well as the franka_ros and serl_franka_controllers setup scripts (usually at <your_catkin_ws>/devel/setup.bash) in your ~/.bashrc. Also, make sure the libfranka shared library is in your LD_LIBRARY_PATH or installed in the system library path /usr/lib.
This is important every time before you start ray on the controller node to ensure that the Franka control packages can be correctly found.
Warning
Currently, the installation of ROS Noetic, libfranka, and franka_ros is only tested against Franka firmware version >=5.7.2 and <5.9.0 with libfranka version 0.15.
For other firmware versions, please first check the compatibility matrix in Franka compatibility.
For a desired libfranka and franka_ros version, you can use export LIBFRANKA_VERSION=<version> and export FRANKA_ROS_VERSION=<version> to specify the versions before running the installation script.
Note
If the script does not work for you, please refer to the official ROS Noectic for ROS Noetic installation, Franka for libfranka and franka_ros installation, and serl_franka_controllers for serl_franka_controllers installation.
Execute the following command to install the dependencies:
# For mainland China users, you can add the `--use-mirror` flag to the install.sh command for better download speed.

bash requirements/install.sh embodied --env franka
source .venv/bin/activate
Training / Rollout Nodes#
A. Clone RLinf Repository#
# For mainland China users, you can use the following for better download speed:
# git clone https://ghfast.top/github.com/RLinf/RLinf.git
git clone https://github.com/RLinf/RLinf.git
cd RLinf
B. Install Dependencies#
Option 1: Docker Image
Use Docker image for the experiment.
docker run -it --rm --gpus all \
   --shm-size 20g \
   --network host \
   --name rlinf \
   -v .:/workspace/RLinf \
   rlinf/rlinf:agentic-rlinf0.3-maniskill_libero
   # For mainland China users, you can use the following for better download speed:
   # docker.1ms.run/rlinf/rlinf:agentic-rlinf0.3-maniskill_libero
Option 2: Custom Environment
Install dependencies directly in your environment by running the following command:
# For mainland China users, you can add the `--use-mirror` flag to the install.sh command for better download speed.

bash requirements/install.sh embodied --model openvla --env maniskill_libero
source .venv/bin/activate
Download the Model#
Before starting training, you need to download the corresponding pretrained model:
# Download the model (choose either method)
# Method 1: Using git clone
git lfs install
git clone https://huggingface.co/RLinf/RLinf-ResNet10-pretrained
git clone https://huggingface.co/RLinf/RLinf-ResNet10-pretrained

# Method 2: Using huggingface-hub
# For mainland China users, you can use the following for better download speed:
# export HF_ENDPOINT=https://hf-mirror.com
pip install huggingface-hub
hf download RLinf/RLinf-ResNet10-pretrained --local-dir RLinf-ResNet10-pretrained
hf download RLinf/RLinf-ResNet10-pretrained --local-dir RLinf-ResNet10-pretrained
After downloading, make sure to correctly specify the model path in the configuration yaml file.
Run It#
Prerequisites#
Get the Target Pose for the Task
To acquire the target pose for the peg-insertion task, you can use the toolkits.realworld_check.test_franka_controller script.
First, you need to activate your Franka robot’s programming mode, and manually move the robot to the desired target pose.
Then, before running, set the environment variable FRANKA_ROBOT_IP to your robot’s IP address:
export FRANKA_ROBOT_IP=<your_robot_ip_address>
Next, run the script:
python -m toolkits.realworld_check.test_franka_controller
The script will prompt you to input command, you can enter getpos_euler to get the current end-effector pose in Euler angles.
Data Collection#
For RLPD experiments, you need to first collect some initial data for training. The data collection only needs to be run on the controller node without other nodes.
Source the virtual python environment and franka_ros and serl_franka_controllers setup scripts:
source <path_to_your_venv>/bin/activate
source <your_catkin_ws>/devel/setup.bash
Modify the configuration file
examples/embodiment/config/realworld_collect_data.yamlby filling your robot’s IP address to the fieldrobot_ip.
cluster:
  num_nodes: 1
  component_placement:
    env:
      node_group: franka
      placement: 0
  node_groups:
    - label: franka
      node_ranks: 0
      hardware:
        type: Franka
        configs:
          - robot_ip: ROBOT_IP
            node_rank: 0
Modify the target_ee_pose field in the configuration file to the target pose you have acquired in the previous step.
env:
  eval:
    override_cfg:
    target_ee_pose: [0.5, 0.0, 0.1, -3.14, 0.0, 0.0]
Run the data collection script:
bash examples/embodiment/collect_data.sh
During the data collection, you can manually intervene the robot using a space mouse to collect data.
The script will terminate after 20 episodes of data collection (can be configured with the num_data_episodes field in the configuration file), and the collected data will be stored in the logs/[running-timestamp]/data.pkl folder.
After data collection, you can upload the collected data to the training/rollout nodes.
Note
Using ZED cameras and Robotiq grippers? A dedicated data collection script and config are available. See the Data Collection section in Using ZED + Robotiq with Franka.
Data Collection with GELLO#
In addition to SpaceMouse, RLinf also supports using GELLO for teleoperation data collection. GELLO is a joint-level teleoperation device that mirrors the kinematic structure of the Franka arm, providing more intuitive and precise control with full gripper support.
Prerequisites
Install the
gelloandgello-teleoppackages. See Using GELLO with Franka for detailed installation instructions.A GELLO device connected to the control node via USB serial.
Identify your GELLO serial port (e.g.
/dev/serial/by-id/usb-FTDI_USB__-__Serial_Converter_FTA0OUKN-if00-port0). You can list available serial ports with:ls /dev/serial/by-id/
Configuration
Use the config file examples/embodiment/config/realworld_collect_data_gello.yaml.
The key differences from the SpaceMouse config are:
env:
  eval:
    use_spacemouse: False
    use_gello: True
    gello_port: "/dev/serial/by-id/usb-FTDI_..."  # Replace with your GELLO serial port
Running
bash examples/embodiment/collect_data.sh realworld_collect_data_gello
The workflow is the same as SpaceMouse collection: use the GELLO device to demonstrate the task, and the script will automatically save successful episodes.
Cluster Setup#
Before starting the experiment, you will first setup the ray cluster properly.
Warning
This step is essential, proceed with caution! Even the slightest misconfiguration may result in missing packages or failure to control the robot.
RLinf uses ray for managing distributed environments. So it is subject to one critical characteristic of ray: when you run ray start on a node, the current Python interpreter and environment variables will be recorded by ray, and all the processes started by ray on that node later will inherit the same Python interpreter and environment variables.
We provide a utility script ray_utils/realworld/setup_before_ray.sh to help you set up the environment before starting ray on each node.
You can modify the script accordingly and source it before starting ray on each node.
Specifically, the script sets up the following important aspects:
Source the correct virtual python environment. See the section on Dependency Installation for details.
Source the franka_ros and serl_franka_controllers packages setup scripts (if on the controller node), usually at
<your_catkin_ws>/devel/setup.bash. If you are using the docker image or the installation script, this is already done when you source the virtual python environment.Setup RLinf environment variables on all nodes:
export PYTHONPATH=<path_to_your_RLinf_repo>:$PYTHONPATH
export RLINF_NODE_RANK=<node_rank_of_this_node>
export RLINF_COMM_NET_DEVICES=<network_device_for_communication> # Optional if you do not have multiple network devices
The RLINF_NODE_RANK is set to 0 ~ N-1 for each of the N nodes in the cluster, and is used by the configuration file to identify the node.
The RLINF_COMM_NET_DEVICES is optional and only needed if you have multiple network devices on your machine, e.g., eth0, enp3s0, which must be the network card providing the IP that can be accessed by other nodes in the cluster.
This can be checked by running ifconfig or ip addr on your machine.
After sourcing the script, you can start ray on each node as follows:
Here <head_node_ip_address> is the IP address of the head node that can be accessed by other nodes in the cluster.
# On the head node (node rank 0)
ray start --head --port=6379 --node-ip-address=<head_node_ip_address>

# On worker nodes (node rank 1 ~ N-1)
ray start --address='<head_node_ip_address>:6379'
You can run ray status to check if the cluster is set up correctly.
Configuration File#
Before starting the experiment, you need to modify the configuration file, examples/embodiment/config/realworld_peginsertion_rlpd_cnn_async.yaml according to your setup.
Similarly, you first need to fill your robot’s IP address to the field robot_ip and the target end-effector pose to the field target_ee_pose.
Then, change the model_path field in both rollout and actor sections to the path where you have downloaded the pretrained model.
Change the data.path field to the path where you have uploaded the collected demo data.
Headless Keyboard Reward Wrapper (Optional)#
If you want to label rewards from a physical keyboard by human, enable the keyboard wrapper in the real-world env config.
For example, in examples/embodiment/config/realworld_peginsertion_rlpd_cnn_async.yaml:
env:
  train:
    keyboard_reward_wrapper: single_stage  # or multi_stage
The available modes are:
single_stage: pressafor failure reward,bfor neutral reward, andcfor success reward.multi_stage: pressa/b/cto switch among reward stages, and pressqto emit a negative reward.
The keyboard listener reads Linux input devices directly, so you should export RLINF_KEYBOARD_DEVICE before starting ray on the controller node.
First, list the available keyboard devices:
ls -l /dev/input/by-id/*-event-kbd
This command shows the stable keyboard name and the corresponding eventX device. For example, usb-Logitech_USB_Keyboard-event-kbd -> ../event20 means the keyboard device is /dev/input/event20.
Before starting training, grant access to that event device:
chmod 666 /dev/input/event20
Then export the event device in your setup script or shell before ray start:
export RLINF_KEYBOARD_DEVICE=/dev/input/event20
If you are using ray_utils/realworld/setup_before_ray.sh, add the export there on the controller node so that all ray-launched env processes inherit it.
Testing the Setup (Optional)#
We provide several test scripts to verify that the setup is correct before starting the experiment. This step is optional but recommended.
First, test the camera connection by running on the controller node:
python -m toolkits.realworld_check.test_franka_camera
Next, test the basic cluster setup by running a dummy setup. Refer to examples/embodiment/config/realworld_dummy_franka_sac_cnn.yaml and add env.eval.override_cfg.
You can set the is_dummy field to True in both env.train.override_cfg and env.eval.override_cfg sections in the configuration file to enable the dummy setup.
And fill the camera serial numbers obtained from running toolkits.realworld_check.test_franka_camera.py into the field camera_serials under both env.train.override_cfg and env.eval.override_cfg.
Then, run the test script on the head node:
bash examples/embodiment/run_realworld_async.sh realworld_peginsertion_rlpd_cnn_async
Run It#
After verifying the setup, you can start the real-world training experiment by running the following command on the head node:
bash examples/embodiment/run_realworld_async.sh realworld_peginsertion_rlpd_cnn_async
Advance: Multi-Robot Setup#
RLinf supports simple management of a fleet of robots for parallel data collection and training.
To set up multiple robots, you need to modify the configuration file to include multiple robot configurations under the node_groups section.
An example configuration for two Franka robots is shown in examples/embodiment/config/realworld_peginsertion_rlpd_cnn_async_2arms.yaml, as follows:
cluster:
num_nodes: 3 # One training/rollout node + two robot controller nodes
component_placement:
  actor:
    node_group: "4090"
    placement: 0 # Run on the first GPU of the training/rollout node
  env:
    node_group: franka
    placement: 0-1 # Two robots assigned to two envs, rank 0 and rank 1
  rollout:
    node_group: "4090"
    placement: 0:0-1 # Two rollout processes on the first GPU of the training/rollout node
node_groups:
  - label: "4090"
    node_ranks: 0 # Node rank 0 is the training/rollout node
  - label: franka
    node_ranks: 1-2 # Node ranks 1 and 2 are the two robot controller nodes
    hardware:
      type: Franka
      configs:
        - robot_ip: ROBOT_IP_FOR_RANK1
          node_rank: 1 # The node rank of the first robot controller node
        - robot_ip: ROBOT_IP_FOR_RANK2
          node_rank: 2 # The node rank of the second robot controller node
Naturally, the settings can be extended to more robots by following the same pattern. For more details regarding the configuration syntax of this kind of heterogeneous hardware setup, please refer to Heterogenous Hardware Setup.
Visualization and Results#
1. Tensorboard Logging
At the ray head node, run:
# Start TensorBoard
tensorboard --logdir ./logs --port 6006
2. Key Metrics Tracked
Environment Metrics:
env/episode_len: Number of environment steps elapsed in the episode (unit: step).env/return: Episode return.env/reward: Step-level reward.env/success_once: Recommended metric to monitor training performance. It directly reflects the unnormalized episodic success rate.
Training Metrics:
train/sac/critic_loss: Loss of the Q-function.train/critic/grad_norm: Gradient norm of the Q-function.train/sac/actor_loss: Loss of the policy.train/actor/entropy: Entropy of the policy.train/actor/grad_norm: Gradient norm of the policy.train/sac/alpha_loss: Loss of the temperature parameter.train/sac/alpha: Value of the temperature parameter.train/alpha/grad_norm: Gradient norm of the temperature parameter.train/replay_buffer/size: Current size of the replay buffer.train/replay_buffer/max_reward: Maximum reward stored in the replay buffer.train/replay_buffer/min_reward: Minimum reward stored in the replay buffer.train/replay_buffer/mean_reward: Average reward stored in the replay buffer.train/replay_buffer/std_reward: Standard deviation of rewards stored in the replay buffer.train/replay_buffer/utilization: Utilization rate of the replay buffer.
Real World Results#
Here we provide demo videos and training curves for the task peg-insertion and charger task, respectively. Within 1 hour of training, the robot is able to learn a policy that can continuously successfully complete the task.
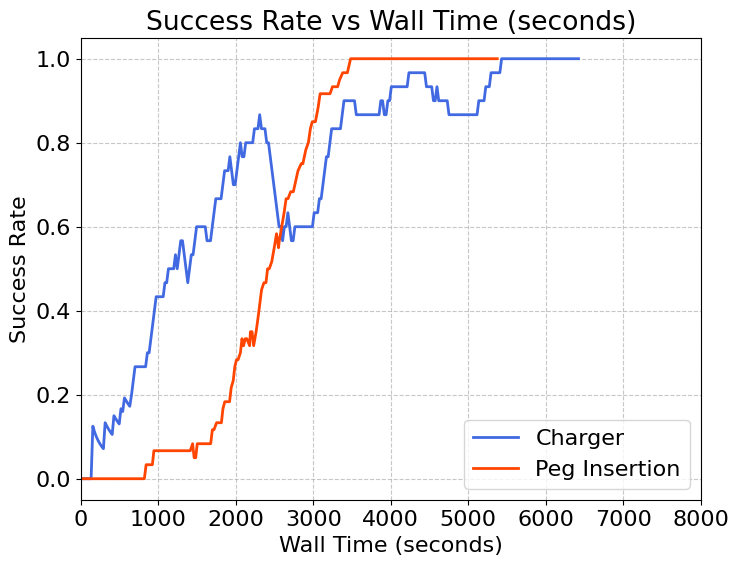
Training Curve
Peg Insertion
Charger